System basics and stimulating organoids#
The NeuroPlatform uses a dedicated API to control the equipment and to acquire data.
Below is an explanation of the system’s main components and how to use them.
See also
StimParamLoader : Utility to help you manage, preview and load stimulation parameters.
Stimulation FAQ : Frequently asked questions and troubleshooting tips for stimulation.
Basic concepts#
Let’s start with a brief description of the components, and an introduction to the core concepts of the system.
Don’t worry if not everything is clear at first, we will put everything in practice below where we show how to use the Python API to control the system.

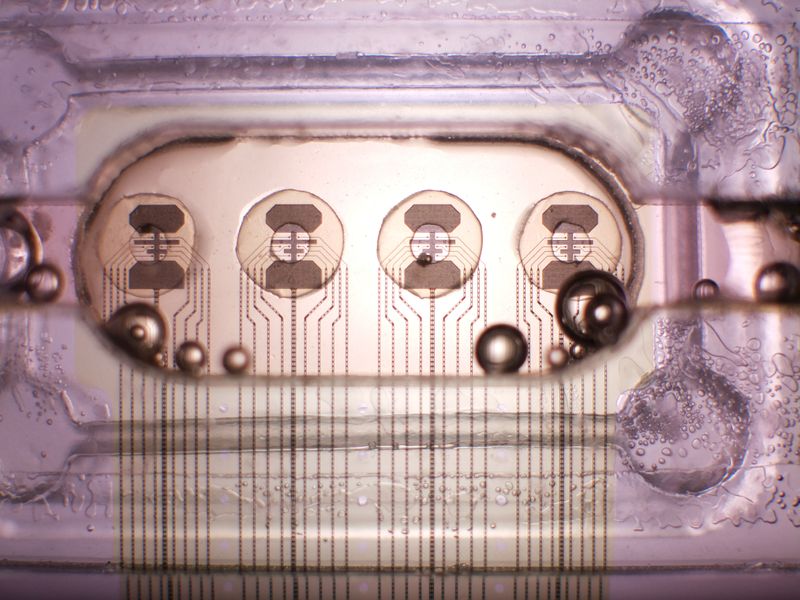
Fig. 1 4x8 layout MEA with neurospheres.#
See our publication in Frontiers in Artificial Intelligence for further details.
System components#

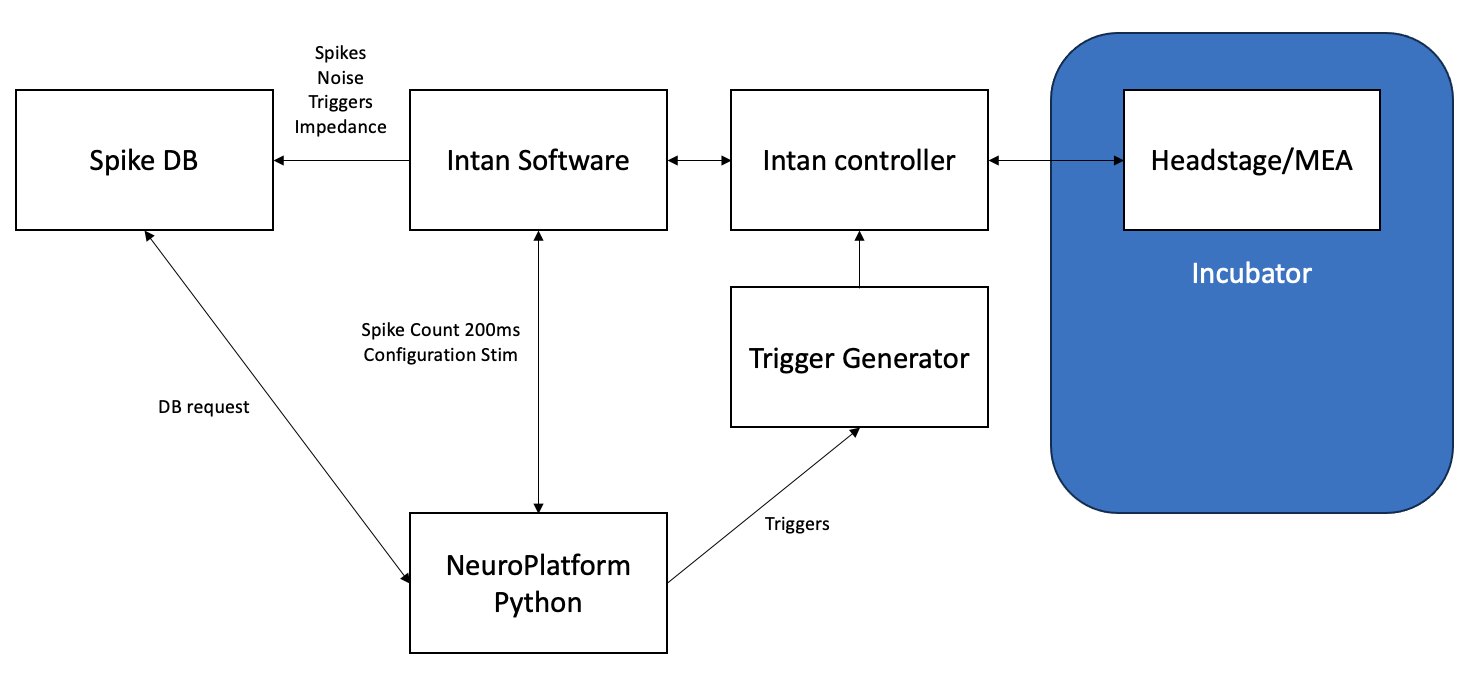
Fig. 2 Overview of the NeuroPlatform system.#
Spike DB : The database recording all data from the electrodes. This is active 24/7 and will record spike events from the electrodes.
A spike event is logged whenever the voltage from an electrode crosses a threshold of six times the standard deviation of the noise.
For an in-depth tutorial on using the database, see the Database tutorial.
Intan Software : This software is connected to the MEAs and is used to configure the system and to acquire data. You will be interacting with this software via Python to control the system.
Intan Controller : The hardware in charge of recording and stimulating the electrodes. This is the physical device that is connected to the MEAs.
Trigger Generator : This device is used to generate triggers that are sent to the Intan Controller.
When you set a StimParam in Python, it will be sent to the Intan software.
When you send a trigger, the trigger generator will send a signal to the Intan Controller to execute the parameter you set for that given trigger.
Core API concepts#
This brings us to some core concepts of the system:
StimParam : This is a set of parameters that define a stimulation. It includes the duration, the amplitude, the frequency, and the electrode to stimulate.
The StimParam is associated with a trigger. Whenever said trigger is sent, the Intan Controller will execute the StimParam associated with that trigger, on the electrode to which the StimParam is associated.
Index : The index of the electrode to stimulate. This is the number of the electrode in the MEA.
Trigger : The trigger is used by the Trigger Generator to send a signal to the Intan Controller to execute the StimParam associated with that trigger. There is a maximum of 16 triggers that can be used, from 0 to 15.
For example, if you send trigger 1 with two StimParams with
trigger_key = 1on electrodes (index) 0 and 1 respectively, the Intan Controller will stimulate electrodes 0 and 1 using the specified parameters when it receives the trigger 0. See the scheme below.
Caution
DO NOT use the same index in two different StimParams. This will overwrite the previous StimParam and only use the last one.

Fig. 3 Associations between triggers and StimParams. If a StimParam is defined for a given index, whenever the trigger is sent, the Intan Controller will execute the StimParam on the electrode associated with that index. Note there can be only one parameter per index, but multiple indices per trigger.#
API usage#
Now, let’s look at code to help you understand the sequence of events, as well as the limitations of the system.
Creating experiments#
To interact with the system, we use a system of tokens and “Experiments”.
Simply use the provided token to create your experiment. This is used to check that no other experiment is running while you use the system, and avoid conflicts.
Note
If you are unable to start your experiment during your booking because another experiment is running, please contact us.
Imports#
import numpy as np
import time
from datetime import datetime
from neuroplatform import StimParam, IntanSofware, Trigger, StimPolarity, Experiment
Experiment and token#
token = "9T5KLS6T7X"  # We provide you with a token for the experiment
exp = Experiment(token)
print(f"Electrodes: {exp.electrodes}")  # Electrodes that you can use
Using your token, you can show which electrodes you may use.
To see the live view of the electrode, go to the Live view page. Remember to check the “Absolute Index” function to get the correct electrode number.
Warning
When you start your experiment, always remember to stop it when you are done using exp.stop().
To start and stop your experiment, we recommend using try... finally blocks to ensure that the experiment is stopped even if an error occurs.
try:
    exp.start()
    ...  # Your experiment code here
finally:
    exp.stop()  # This ensures a proper shutdown of the experiment
Stimulation parameters#
Now we can define the stimulation parameters.
Through Python, you will be controlling the Intan software to set the stimulation parameters.
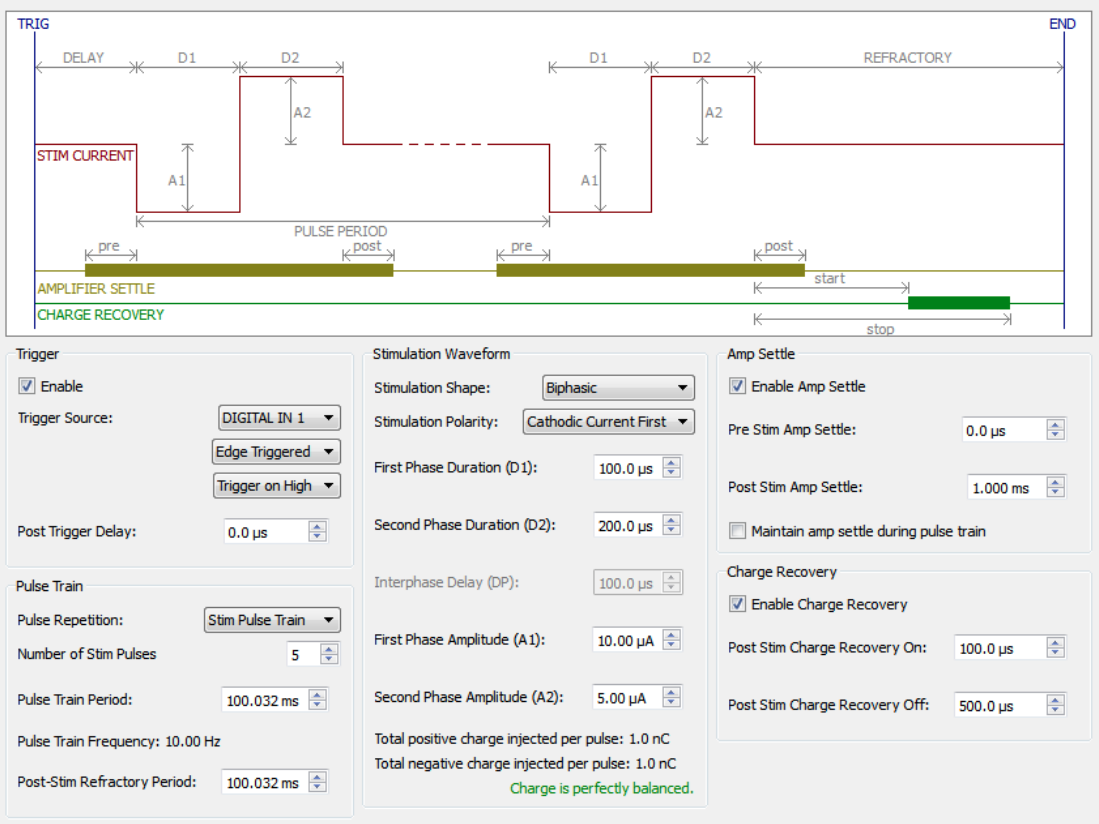
The software defines stimulations using the elements shown here :

Fig. 4 Stimulation parameters.#
Tip
Feel free to use this as a visual reference when setting your parameters.
Stimulation parameters are defined by several values, such as the amplitude, the duration, and the electrode to stimulate. See below for a detailed explanation of the parameters.
StimParam reference#
Name |
Description |
Default Value |
|---|---|---|
|
Enable stimulation |
True |
|
Electrode index [0-127] |
0 |
|
Trigger key [0-15] |
0 |
|
Polarity of the stimulation |
NegativeFirst |
|
D1 [us] |
100.0 |
|
A1 [uA] |
1.0 |
|
D2 [us] |
100 |
|
A2 [uA] |
1.0 |
————————– |
————————————– |
————— |
|
Stimulation Shape |
Biphasic |
|
Interphase delay [us] |
0.0 |
|
Post trigger delay [us] |
0 |
|
Number of pulses |
0 |
|
Pulse Train Period [us] |
10000 |
————————– |
————————————– |
————— |
|
Post-Stimulation Refractory Period [us] |
1000.0 |
|
Enable amplitude settling |
True |
|
Pre-stimulation amplitude settling [us] |
0.0 |
|
Post-stimulation amplitude settling [us] |
1000.0 |
|
Enable charge recovery |
True |
|
Post charge recovery on [us] |
0.0 |
|
Post charge recovery off [us] |
100.0 |
Setting the stimulation parameters#
The first section of the table contains the basic parameters for the stimulation.
You likely will have to adapt these for each experiment.
If possible, balance the charge of the stimulation.
Ensure that \(\text{phase_duration1} \times \text{phase_amplitude1} = \text{phase_duration2} \times \text{phase_amplitude2}\).
This improves the lifetime of both the organoid and the electrodes.
The polarity can greatly affect the response. Please remember to check which polarity is best for your experiment.
The second section contains useful parameters you may want to modify for specific experiments.
The
nb_pulseparameter is useful for burst stimulation.The
pulse_train_periodparameter is useful for setting the period of the burst stimulation.
The last section contains parameters that we recommend leaving as-is.
Please contact us if you have questions regarding the relevance of these parameters for your experiment.
Note
Due to the network-based nature of the communication between components, using Python to time your stimulation (e.g. with time.sleep()) will always be less precise than using the pulse train settings.
However, the pulse train settings may not be changed quickly during the experiment, due to the delay when sending the parameters to the headstage of the MEA.
Therefore, you must choose between flexible spike trains with less precise timing (Python) or precise timing with less flexibility (pulse train settings).
Example#
stim_param1 = StimParam()
stim_param1.enable = True  # Enable the stimulation
stim_param1.trigger_key = 0  # Trigger key to be used
stim_param1.index = 0  # Index of the stimulation
# --- Stimulation parameters --- #
stim_param1.polarity = StimPolarity.PositiveFirst
stim_param1.phase_duration2 = 100
stim_param1.phase_duration1 = 100
stim_param1.phase_amplitude2 = 1
stim_param1.phase_amplitude1 = 1
stim_param1.display_attributes()
stim_param2 = StimParam()
stim_param2.index = exp.electrodes[
    8
]  # Use your provided electrodes to choose the site of stimulation

stim_param2.enable = True
stim_param2.trigger_key = (
    10  # The trigger key that will be used to send the stimulation
)
stim_param2.polarity = StimPolarity.NegativeFirst
stim_param2.display_attributes()
When you create a parameter, remember the concepts we previously showcased:
Index : You specify the electrode you want to stimulate.
As mentioned, you cannot use two distinct parameters with the same electrode index. This will overwrite the previous parameter.
Trigger key : You specify the trigger that will be sent to the Intan Controller. The controller can accomodate up to 16 triggers (from 0 to 15).
When you send a trigger, the Intan Controller will execute the parameter(s) associated with that trigger.
Enable : if the parameter is enabled, the Intan Software will record that a given parameter is set for a given trigger.
Warning
When you finish your experiment, make sure to disable all StimParams by setting enable to False and sending them to the Intan Software.
Connecting to the Intan and the TriggerGenerator#
Next, we will review the connection to the IntanSoftware and the TriggerGenerator, and how to send the parameters we created.
Connecting to the Intan and sending parameters#
To send the parameters to the IntanSoftware, simply do the following:
intan = IntanSofware()
params = [stim_param1, stim_param2]  # Create a list of stimulation parameters

intan.send_stimparam(
    params
)  # Send the stimulation parameters to the Intan software. THIS TAKES 10 SECONDS
...
intan.close()  # Close the connection to the Intan software
Caution
Always close your connection to the Intan when you are done using intan.close().
Sending the parameters will take ten seconds to complete. This is because the IntanSoftware will check the parameters and send them to the Intan Controller, and then to the headstage of the MEA.
This is a limitation of the system, and we are working on improving this delay; currently this cannot be bypassed, therefore parameters have to be set before your experiment starts, or during a ten-second pause in your experiment.
Note
Sending the parameters to the IntanSoftware will not stimulate the electrodes. You must send a trigger to the TriggerGenerator to stimulate the electrodes.
See the next section for more information.
Connecting to the TriggerGenerator and sending triggers#
The main new concept here is how to send triggers.
When you send a given trigger(s), the TriggerGenerator will send a signal to the Intan Controller to execute the StimParam(s) you set for the trigger(s).
To send triggers, use a 16-length array of uint8 to send the triggers. If the value is 1, the trigger is sent. If the value is 0, the trigger is not sent.
For example, to send trigger 3, we would define the array as follows:
trigger_gen = Trigger()
trigger_array = np.zeros(
    16, dtype=np.uint8
)  # Here all the triggers are set to 0, so none will be sent

trigger_array[3] = 1  # This will send a trigger to the stimulation with trigger_key = 3
...  # Run experiment...
trigger_gen.close()  # Close the trigger generator
To enable several triggers at once, simply set all the corresponding indices to 1.
Caution
Always close your connection to the TriggerGenerator when you are done using trigger_gen.close().
Example experiment#
Let’s look at a small minimal experiment, and put together all the concepts we have seen so far.
intan = IntanSofware()  # Here we connect to the Intan software
trigger_gen = Trigger()  # Here we connect to the trigger generator

stim_params = [stim_param1, stim_param2]

try:
    if exp.start():  # Signal the start of an experiment to all users
        # Send stim parameter
        intan.send_stimparam(stim_params)
        start_exp = datetime.utcnow()
        print(start_exp)

        trigger0 = np.zeros(16, dtype=np.uint8)
        trigger0[0] = (
            1  # Enable stimulation on trigger 0, which is bound to stim_param1
        )

        for i in range(10):
            # Stimulation on electrode 0
            trigger_gen.send(
                trigger0
            )  # Here we send ten times the StimParam on electrode 0

            time.sleep(1)

        #################

        trigger0and10 = np.zeros(16, dtype=np.uint8)
        trigger0and10[0] = 1
        trigger0and10[10] = 1

        for i in range(10):
            # Stimulation on both electrodes
            trigger_gen.send(
                trigger0and10
            )  # Here we stim on both electrodes at the same time
            time.sleep(1)

        stop_exp = datetime.utcnow()
        print(stop_exp)

        # Disable all stims
        for stim in stim_params:
            stim.enable = False
        intan.send_stimparam(stim_params)

finally:
    # Close the connection to trigger generator
    trigger_gen.close()
    # Close the connection to intan software
    intan.close()
    # Signal the end of an experiment to all users
    exp.stop()
Advanced functionalities#
This section lists a few additional functionalities that you may find useful depending on your experiment.
Tagging triggers#
You can tag triggers with a number to identify them more easily.
When you retrieve the triggers in the database, you will see the tag you set.
intan.set_tag_trigger(1) # Triggers will have this tag attached to them in the database
Fixed threshold#
You can set the threshold for spike events to be fixed, which means it will be constant throughout the experiment.
As mentioned earlier, the threshold is six times the standard deviation of the noise. This is recomputed when the variable threshold is enabled.
During bursts or stimulation, this standard deviation may increase, which will overall lower the amount of events recorded.
Caution
ALWAYS set back the variable threshold to enabled after finishing your experiment.
If you need to set a fixed threshold, for example to account for a drift in the noise or activity, you can use:
try:
    ...  # exp.start, other setup code
    intan.var_threshold(False)  # Disable the variable threshold
    ...  # your experiment code
finally:
    intan.var_threshold(True)  # Enable the variable threshold
    ...  # disable parameters, other cleanup code
    exp.stop()  # Signal the end of the experiment
Impedance measurement#
You can ask the Intan to measure the impedance of the electrodes. This takes ten seconds to complete, you can then retrieve the impedance values from the database.
intan.impedance()
